When the temperature drops or the rainy season sets in, most golfers and neighborhood cruisers tend to park their vehicles. However, the right gear can transform your cart from a summer luxury into a year-round utility. Investing in high-quality Golf cart enclosures is the most effective way to maintain comfort and protect your vehicle’s interior from the elements.
Whether you are navigating a coastal course in the rain or commuting through a chilly gated community, the barrier provided by Golf cart enclosures ensures that your “off-season” is just as productive as your summer. In this guide, we explore the technical aspects of selection, installation, and the legal considerations of DIY modifications.
Table of Contents
Understanding the Structural Protection of Golf Cart Enclosures
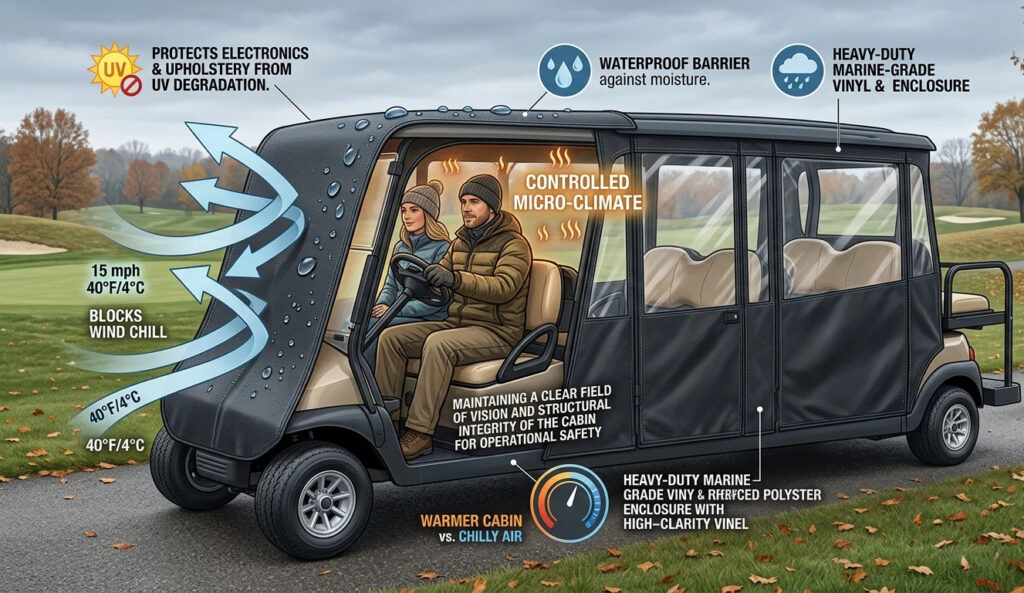
The primary function of Golf cart enclosures is to create a controlled micro-climate. High-quality covers use heavy-duty marine-grade vinyl or reinforced polyester to block wind chill, which can make a 40°F (4°C) day feel significantly colder when moving at 15 mph.
Beyond thermal comfort, Golf cart enclosures protect the cart’s sensitive electronics and upholstery from UV degradation and moisture. According to safety guidelines for small task-oriented vehicles, maintaining a clear field of vision and structural integrity of the cabin is paramount for operational safety.
Engineered for Resilience: Waterproof 4-Passenger Golf Cart Covers for Winter
For families or transport fleets, selecting waterproof 4-passenger golf cart covers for winter requires attention to material science. Not all “waterproof” fabrics are created equal. Look for denier ratings of 600D or higher, which indicate a high-density weave capable of resisting tears from ice or frozen debris.
The “Cold-Crack” rating is the most critical technical spec for winter use. Premium Golf cart enclosures utilize vinyl windows treated to withstand temperatures as low as -10°F without becoming brittle or cracking. If you frequently encounter heavy snow or sleet, a “sloped roof” design in your enclosure helps prevent water pooling, which can lead to material stretching and eventual leakage.
How to Install Golf Cart Enclosures: Efficiency and Legal Compliance
Most modern systems utilize either a “slip-on” (Over-the-Top) method or a “track-mounted” system. Slip-on models are ideal for seasonal users as they require no permanent modification to the vehicle’s frame.
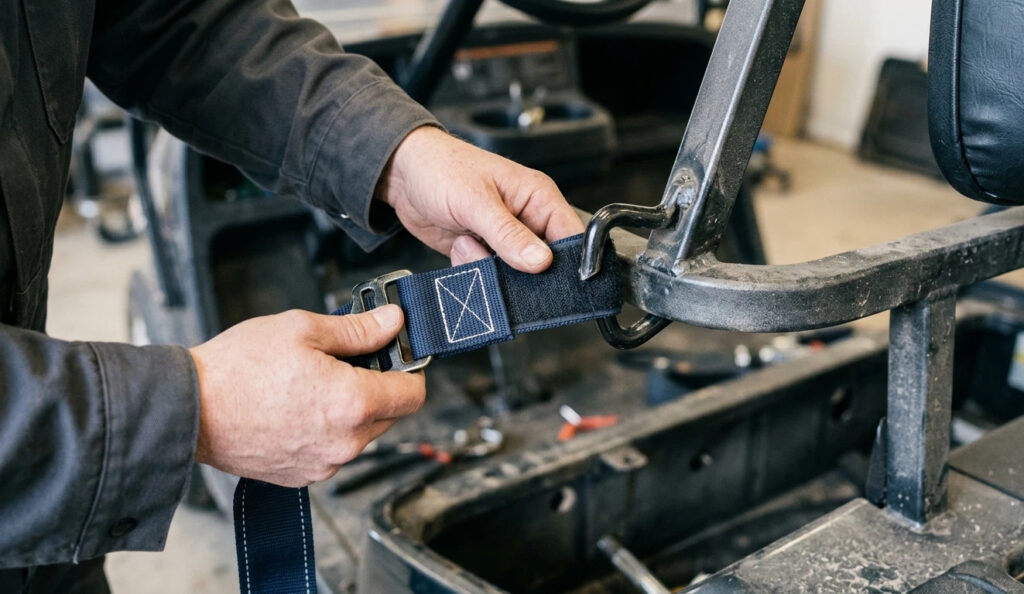
The DIY Installation Process:
1.Preparation: Drape the enclosure over the roof to let the material “relax” in the sun for 20 minutes; this makes the vinyl more pliable.
2.Alignment: Secure the front windshield section first to ensure your line of sight is centered.
3.Securing: Use the integrated hooks or Velcro straps to tension the side panels against the fenders.
Legal Note on DIY Modifications: When you execute a golf cart enclosure installation, you must remain compliant with local Low-Speed Vehicle (LSV) regulations. In states like Florida and California, if your cart is “street-legal,” your enclosure must not obstruct side-view mirrors, turn signals, or brake lights. Many DIYers accidentally cover their reflectors or lights, which can lead to citations. Always ensure your transparent panels allow for 360-degree visibility as required by Department of Transportation (DOT) standards.
Portable Golf Cart Heaters: Synergizing Warmth within a Golf Cart Winter Enclosure
An enclosure blocks the wind, but it doesn’t generate heat. To achieve true cabin comfort, many owners pair their golf cart winter enclosure with portable golf cart heaters. There are two primary types: propane-powered (cup holder style) and electric-powered (wired to the battery).
While a golf cart winter enclosure is excellent at trapping heat, safety is vital. Propane heaters require adequate ventilation to prevent carbon monoxide buildup. Ensure your Golf cart enclosures have zippered vents or leave a small gap at the bottom of the door to allow for fresh air exchange. For electric carts, a 48V-to-12V reducer is often necessary to prevent the heater from draining specific battery cells unevenly.
Visibility and Durability: Maintaining Your Enclosure Against UV and Ice
The longevity of Golf cart enclosures depends heavily on how you treat the clear vinyl windows. Standard glass cleaners often contain ammonia, which can cause vinyl to yellow and become hazy over time. Instead, use a specialized “plastic cleaner and polish” to maintain optical clarity.
During the winter, avoid using scrapers on the windows of your Golf cart enclosures. If ice builds up, use lukewarm water or a specialized de-icer spray. When the season ends, ensure the enclosure is 100% dry before folding; storing a damp golf cart winter enclosure will lead to mold and permanent staining of the transparent panels.
Final Thoughts
The decision to invest in Golf cart enclosures ultimately comes down to your local climate and how often you rely on your vehicle. For those in high-moisture areas, prioritizing waterproof 4-passenger golf cart covers for winter with heat-sealed seams will provide the best long-term ROI.
If you prefer a hands-on approach, mastering the golf cart enclosure installation yourself allows you to adapt the vehicle to changing weather patterns quickly. By combining a high-quality golf cart winter enclosure with safe heating practices and legal compliance, you can enjoy the freedom of your cart 365 days a year, regardless of what the forecast says.
Perguntas frequentes
Will a 4-passenger enclosure fit my 2-passenger cart?
Generally, no. Golf cart enclosures are sized specifically to the roof length. A 4-passenger cart has an extended roof; using that cover on a 2-passenger cart will result in excess material that can get caught in the wheels.
How long does a typical golf cart enclosure installation take?
For an “Over-the-Top” model, a first-time install takes about 20–30 minutes. Once you are familiar with the strap locations, it usually takes less than 10 minutes.